Installazione su Raspberry Pi
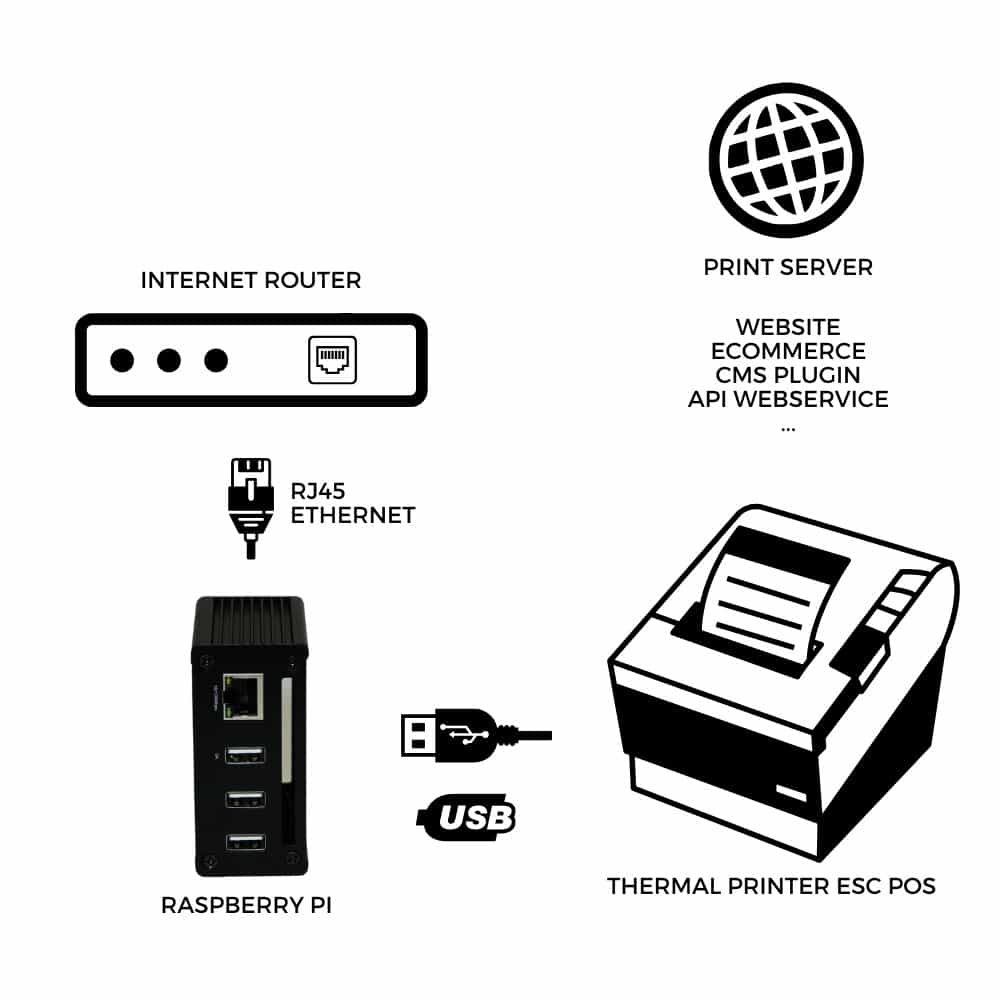
Trasformate il vostro Raspberry Pi Zero o 4 in un server di stampa cloud. Collegate una stampante USB, connettetevi alla rete e iniziate a inviare stampe da qualsiasi applicazione o API.
Avete acquistato una scheda SD Expedy per Raspberry Pi oppure il file IMG.GZ scaricabile, compatibili con Raspberry Pi Zero e 4, tutte le versioni. Grazie per la vostra fiducia! 😊
ℹ️ Utilizzate un Raspberry Pi 1, 2, 3 o 5? Contattateci
Avete già una scheda SD preinstallata? Passate direttamente al passo 4, Avviare il RPI.
1. Scaricare il file IMG.GZ
Scaricate il file immagine Expedy dalla vostra conferma d'ordine oppure direttamente dalla pagina del prodotto.
2. Installare Raspberry Pi Imager
Download: https://www.raspberrypi.com/software/
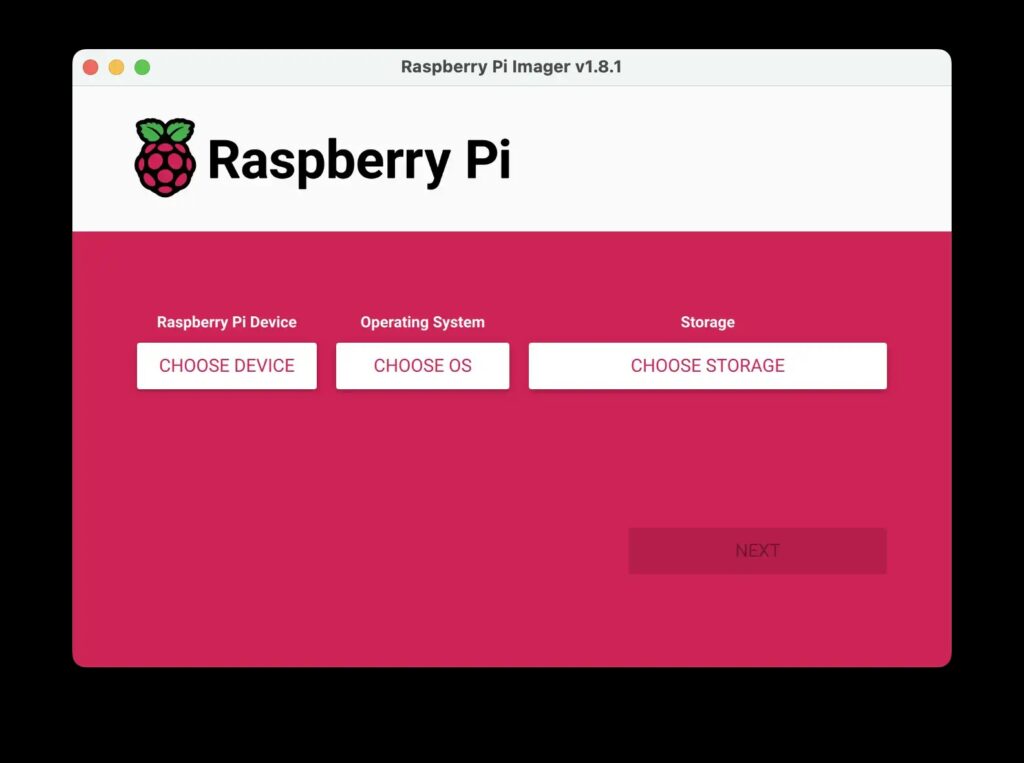
- Inserite una scheda SD nuova nel vostro computer (minimo 8 GB)
- Raspberry Pi Device, lasciate vuoto
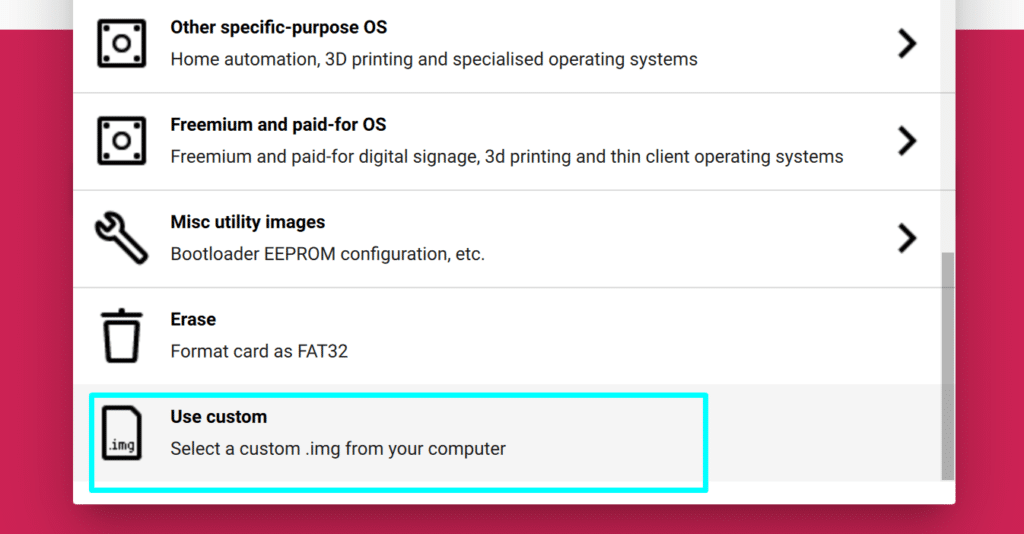
- Operating System, selezionate Use Custom e scegliete il file
.img.gzscaricato - Storage, selezionate la vostra scheda SD
- Fate clic su Write. Se Raspberry Pi Imager propone di applicare impostazioni personalizzate, scegliete No
3. Inserire la chiave API
- Inserite la scheda SD nel vostro computer
- Aprite il volume boot della scheda SD
- Modificate il file
rpi_id.txte inserite la chiave RPI ID univoca ricevuta via email, Acquistare una chiave - Salvate il file ed espellete la scheda SD in modo sicuro
4. Avviare il RPI
- Inserite la scheda SD nel vostro Raspberry Pi Zero o 4
- Collegate il Raspberry Pi al vostro router tramite cavo Ethernet
- Collegate la vostra stampante alla porta USB1
- Accendete il Raspberry Pi
5. Impostazioni della stampante
- Accedi su https://www.expedy.fr/console/v3/
- Apri il dispositivo, da Macchine o da Stampanti a seconda di come è stato registrato
- Nella scheda Verifica stato, fai clic su Verifica stato. Per un Raspberry Pi la console interroga la macchina tramite l'API e risponde Online o Offline
- Apri la scheda Impostazioni Raspberry Pi e fai clic su Scansione USB
- La griglia Porte USB elenca ciò che è collegato da
USB 1aUSB 4. Una porta senza nulla collegato mostra Libera, e l'ora dell'Ultima scansione compare accanto al titolo
Ogni porta rilevata espone poi i propri selettori:
| Selettore | Opzioni |
|---|---|
| Modo stampa | ESC/POS per le stampanti per scontrini con comandi ESC/POS (Epson TM, Star TSP143, Munbyn, Citizen), nessun driver. LABEL per stampanti laser, inkjet, di etichette e foto, che richiedono un driver. |
| Larghezza | 58, 80, 104 o 210 MM, in base al rotolo effettivamente caricato |
| Modo grafico | Graphics (Default), oppure BitImageRaster / BitImageColumn se l'assistenza lo richiede |
Non è ancora registrato sul tuo account? Vedi Aggiungere un server di stampa Raspberry Pi al tuo account.
6. Collegare la tua applicazione
- Sfogliare le integrazioni senza codice
- Creare un lavoro di stampa con l'API
- Impostare il layout degli scontrini
Domande frequenti
Il PING non mostra la data odierna, cosa verificare?
- Verificate la connessione di rete
- Assicuratevi che la chiave RPI ID sia inserita correttamente in
rpi_id.txt - Verificate che la porta 1883 sia aperta sul vostro router. La maggior parte dei modem Internet standard la apre per impostazione predefinita, contattate il vostro fornitore di rete se non avete accesso al router
Il Raspberry Pi è connesso e la stampante è riconosciuta, ma non si stampa nulla?
- Andate su Printers → Selezionate la stampante → Print Jobs History e verificate la presenza di richieste API
- Verificate il collegamento USB sulla porta USB1, i plugin e Zapier utilizzano USB1 per impostazione predefinita. Nelle integrazioni su misura potete indirizzare qualsiasi porta USB e collegare fino a 4 stampanti sullo stesso Raspberry Pi
Il Raspberry Pi può connettersi in Wi-Fi?
Sì, il Wi-Fi è supportato. Per maggiori dettagli, contattateci.