Configuración WiFi
Existen 4 formas de configurar el Wi-Fi en su impresora Expedy:
- Software para Windows
- WPS (automático, sin introducir contraseña)
- Smartphone
- API remota (requiere la opción Cloud)
1. Software para Windows
Modelos compatibles: PP58EWG, PP58EWG-R, PP80EWG, XPDY80EWB, XPDY80EWBG, PP80UEWBT, XPDY80UWB, PP80USBEBW, XPDY80U, XPDY80USBEBW, XPDYPOS80UEB
Antes de empezar, consulte cómo conectar el software a la impresora.
Descargar el software PrinterSetting ->
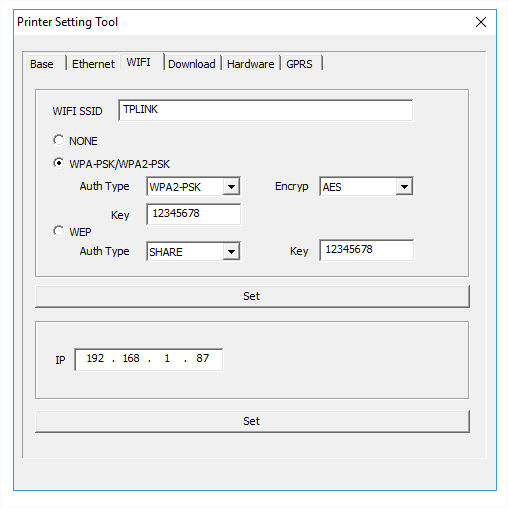
- Abra la pestaña Wi-Fi
- Introduzca el SSID de su red Wi-Fi (el nombre de su router o de su caja de Internet)
- Introduzca su clave secreta WPA (contraseña)
- Haga clic en SET. La impresora se reiniciará y se conectará
⚠️ Los nombres de red y las contraseñas Wi-Fi distinguen entre mayúsculas y minúsculas. Compruebe que no haya ninguna lista blanca de direcciones MAC configurada en su router.
ℹ️ Solo se admiten las redes de 2,4 GHz. La banda de 5 GHz no es compatible.
ℹ️ El software permite escribir parámetros, pero no puede leer la configuración existente de la impresora. Los valores que aparecen en el software son solo ejemplos.
Desactivar el Wi-Fi
En la pestaña Wi-Fi, seleccione NONE y haga clic en SET para confirmar.
2. WPS (configuración automática)
Modelos compatibles: XPDY80EWB, XPDY80EWBG
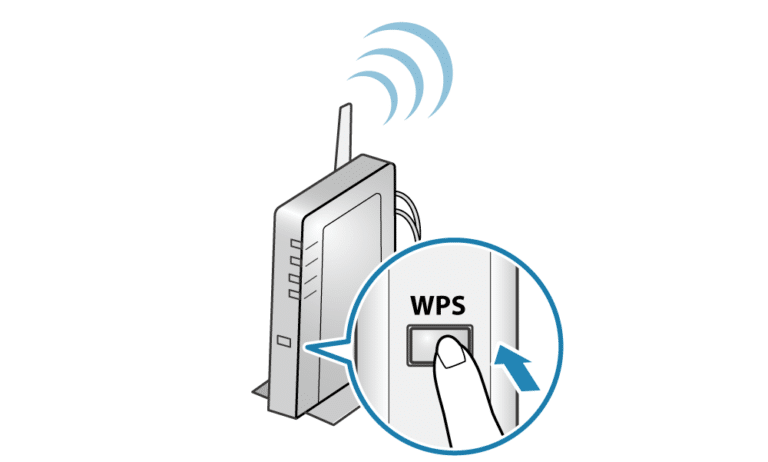
El WPS permite conectarse a una red Wi-Fi protegida sin introducir manualmente ninguna contraseña.
- Pulse el botón WPS de su router o punto de acceso
- Encienda la impresora
- En el menú de la impresora, vaya a Enter -> Start WiFi WPS y pulse Enter
- Vuelva al menú principal, la impresora se conectará automáticamente
3. Smartphone (Wi-Fi directo)
Paso 1. Conecte su teléfono al punto de acceso de la impresora
- Abra los ajustes Wi-Fi de su teléfono
- Conéctese a la red DIRECT-XXX
- Contraseña por defecto: 88888888
- Si su teléfono avisa de que la red no tiene acceso a Internet, elija Mantener la conexión, es lo normal
Paso 2. Configure el Wi-Fi desde su navegador
- Escanee el código QR impreso por la impresora, o abra http://192.168.223.1 en el navegador de su teléfono
- Introduzca el SSID y la contraseña de su red Wi-Fi
⚠️ Respete exactamente las mayúsculas, minúsculas, guiones y guiones bajos

4. API remota (Cloud)
Modelos compatibles: PP58EWG, PP58EWG-R, PP80EWG, XPDY80EWB, XPDY80EWBG
ℹ️ La opción Cloud debe activarse previamente, más información.
La impresora ya debe estar conectada a Internet para recibir el comando. Conéctela mediante cable Ethernet o tarjeta SIM 3G/4G y espere hasta que el LED se ponga en verde fijo (Server Connected).
- En la consola Expedy, vaya a Printers -> Select printer
- Envíe el siguiente comando como mensaje de impresión:
<SETWIFI>ssid<ssid/pwd>pwd</SETWIFI>
Este comando también puede enviarse a través de la API.
⚠️ Los nombres de red y las contraseñas Wi-Fi distinguen entre mayúsculas y minúsculas. Compruebe que no haya ninguna lista blanca de direcciones MAC configurada en su router.
ℹ️ El router debe permitir el puerto TCP/UDP 1883 (entrante y saliente).
ℹ️ Solo se admiten las redes de 2,4 GHz. La banda de 5 GHz no es compatible.